|
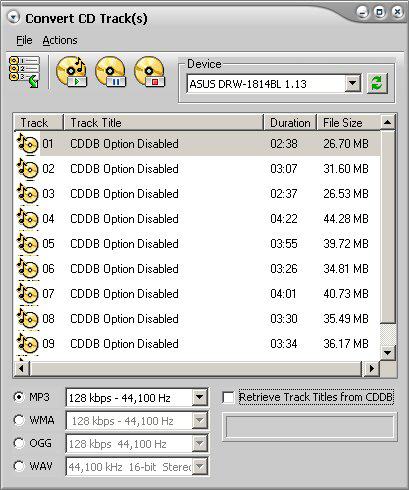
Convert CD Track(s)
Blaze Media Pro converts CD audio tracks directly to MP3, OGG, WMA, or WAV formats. The Convert CD Track(s) command provides a CDDB auto-save feature, which enables track title, artist, and album information to be dynamically downloaded from the Internet CD database. The information is then used when converting CD tracks to WAV, MP3, WMA, or OGG. You can configure this feature to use as much or little of the information in any preferred order. Of course, you can also disable this feature if you do not wish to be connected to the Internet while converting CD tracks.
 Tip Tip
| • | If the converted file does not have the expected quality, or the conversion does not complete successfully, the computer's configuration or files being converted might not support the default conversion method. You can set an option to change the way Blaze Media Pro's conversions operate for increased compatibility. To do this, in the main window of Blaze Media Pro, click the Options menu and select General. On the General Settings dialog box, click Use Alternate Conversion Methods. Once you set this option, try the conversion again. |
| 1. | Insert an Audio CD into the CD-ROM drive. If you have more than one CD-ROM drive, you can select the one you want to use from the Device drop-down list. You can also change the speed by selecting the speed from the Speed drop-down list but unless you are having problems or specific preferences it is best to leave the speed at Default. |
Tips
| • | If you want to get the track titles from the online CD database, make sure the option on the window is enabled. |
| 4. | to which you want the selected tracks to be converted. |
| 6. | Click the Convert button or select Actions>Convert Audio Track(s). This begins the conversion process. |
Tips
| • | If you click Enable CDDB Auto-Save, the files are named according to Auto-Save options. (See the File Menu selections below.) |
| • | After your initial conversion, the options selected are saved. Therefore, for future conversions, you would need to only perform steps 1, 2, 4, and 6. |
| • | Set the audio format for complete control over file size or quality. |
Click on the following links for menu information.
|